Saturday, December 11, 2010

Adam tablet - pre-order confirmation

I've received a « Confirmation from Notion Ink » for my pre-order on their Adam tablet.

Here is the contents
Dear [my first name]

Greetings from Notion Ink Support Team!
We heartily congratulate you for being one among the first owners of ADAM. Kindly take a note of your order details.

Shipping Address:-
[my address here]

Amount Transacted: [the amount]
Order Number: [the order number]
Registered Email Id: [my email]
We have successfully received your order, your adam will be shipped as per the timelines indicated at the time of order. If you ordered for 3G models, we will send the one as per the country specified in your shipping address along with the compatible charger.

Please quote your Order Number & use your registered email address for all communications. For any assistance write to preordersupport@notionink.com

Regards,

Notion Ink Support Team

Friday, December 10, 2010

Android tablet - Notion Ink's Adam pre order have started

[UPDATE 2010 12 11 06:36] STRONG CONCERNS have been issued about Notion Ink's Adam tablet pre-ordering process. Details are in the comments. You MUST definitely read them BEFORE ordering.


Notion Ink's Adam pre-orders have started a few hours ago.


There are 4 models, and the delivery delay is about 6-8 weeks


[UPDATE 2010 12 11 06:56]

«
Your credit card will be charged at the end of this process. You may cancel your order any time before the device ships, subject to a 5% cancellation charge.
»


Notion Ink's Adam pre-ordering « The detailed Warranty Terms & Policies, Support Details & Procedures will be shipped along with the product. »

«
The detailed Warranty Terms & Policies, Support Details & Procedures will
be shipped along with the product.


Shipping & Payments:
1. Notion Ink holds no responsibility for the shipments delayed or lost due
to unforeseen & unavoidable reasons arising due to Man Made or natural
circumstances.
2. The user indemnifies Notion Ink for Shipments lost or returned due to wrong
address provide to Notion Ink, in such cases any extra charges or penalties
applicable will be borne by buyer. Notion Ink suggests all the buyers to
provide the complete address with ZIP CODE & CONTACT NUMBERS to avoid
such circumstances.
3. Any Customs duty, clearance charges, handling charges or taxes levied by
the customs or the Government of destination Country will be borne by the
buyer & Notion Ink suggests that these charges can vary from 0% to 100% of
invoice value as per Country norms.
4. Any Returns coming to Notion Ink, due to wrong address or refusal due to
charges arising as stated in point 3, will attract a charge of reshipping &
penalty of 10 USD along with any charges paid by Notion Ink not limited to
customs duty, handling charges, taxes & service charges levied by shipping
partner.

Warranty Policy:
1. Every product purchased from Notion Ink Web store is entitled for 1year
International Limited Warranty under following Conditions-
a. Unlimited Email Support (preordersupport@notionink.com)
b. Limited Telephonic Support
c. Limited warranty of 180 days on Battery, entitle for replacement if the
Battery life is less than 50% under normal conditions.
2. To avail the Technical Support, you need to write an email & a Customer Care
Executive will get in touch with you within 24hours for further assistance.
3. In case your products needs a physical inspection or repair, you need to ship
the product with return shipping paid to Notion Ink’s International Service
Centre’s along with an transaction number of 9USD payment made on Notion
Ink Website as International Service Assistance Fees. Notion Ink upon receipt
of the product will communicate with you on the basis of diagnosis & will
assist you further. This entire process can take 3-10 working days or more
depending upon the problem diagnosed.
4. Notion Ink upon diagnosis of the problem can replace the product with new*
product of same model (* New product can be new, refurbished or equivalently
functional compared to the product submitted)
5. If a submitted product is found tampered with or damaged or abused or under
conditions of illegal use as per NI policies, NI reserves the right of refusal to
warranty claims & can apply a fees as per the diagnosis.


Return Policy:
You can initiate a refund process within 7 days of your product receipt under the
following conditions stated in below points.
1. If the product is defective/ Dead on Arrival/ Incorrect, you must contact
Notion Ink at preordersupport@notionink.com & open up a case for
Return, In this case you need to ship the product back with all the original
packaging, accessories etc along with the letter from yourself stating the
reason. After the inspection of the product & evaluation of your case,
Notion Ink will refund the entire amount minus 5% service fees of the
invoice value. You can also opt for the replacement product at no extra
cost except the 5% Service Fees of invoice value.
2. Notion Ink offers a no questions asked return policy. If you wish to return
your product under this policy, you must open a case by emailing
preodersupport@notionink.com & ship the product back & a Letter
with reason for return to Notion Ink & after evaluation of your case & the
product, Notion Ink will refund the amount after deducting the Shipping
fees & service fees of 5%.
3. If in any of the cases the product is found tempered, Notion Ink Reserves
the right to refuse the refund or deduct a fees up to 75% of the cost of the
product as per the evaluation report of product plus a inspection fees of
9USD.
4. If in any case the Product packaging is found damaged, Notion Ink
reserves the rights to deduct a amount of 5% as repackaging Plus 3% as
restocking fees of the final invoice value.
»

Wednesday, December 8, 2010

TrackSite : backup

A new backup activity (screen) has been introduced in Track Site. It allows :
  • a local backup where the backup file is stored on the SD card
  • a remote backup where the backup file is sent to an email account as an email attachment. It's not a cloud-based backup, but the idea is to use the mailing box as a secure place to keep the backup and a way to provide ubiquitous access to the backup when needed

The remote backup automatically makes a local backup then sends the backup file as an attachment.

Some instructions are given in the email :
IMPORTANT :
keep the attachment file in a safe place as it may content private information

TO RESTORE :
1) save it on the target phone SD card, at the root (not in a directory),
2) then in Track Site, use restore (Menu -> More -> Restore)

Tuesday, November 30, 2010

Track Site's rating in the Android Market

I've rated my Track Site app at the « Teen » level according to the guidelines that have been supplied at Android Market Help Center http://market.android.com/support/bin/answer.py?answer=188189.

The specific rules that have made me rate my Track Site app « Teen » instead of « All » is the section
User Generated Content and User to User Communication

Apps rated “All” should not host any user generated content or enable communication between users. Apps that focus on allowing users to find and communicate with each other should be rated “Teen” or above.
and more specifically the first sentence :
Apps rated “All” should not host any user generated content or enable communication between users.

As Track Site allows users to enter a description on each bookmark and send their bookmarks by emails or by texting (SMS), I just can't rate it « All ».

Friday, November 12, 2010

Track Site : permissions that are asked for

Permissions have been reworked : Track Site doesn't ask anymore for READ_CONTACTS and SEND_SMS permissions.

Nevertheless it's still possible to send a bookmark by email or by text (SMS), as Track Site passes control to the stock communication apps (Gmail, Email, Messaging, ...) to do the job. Those stock communication apps already have been granted the required permissions (to read contacts and to send SMS /texting) by the user when they have been installed.


Permissions that Track Site previously asked of


Permissions that Track Site now asked for


Here is a screenshot of how permissions appears on the Android Market now

Thursday, November 11, 2010

obfuscation : how to use the obfuscation in the android app development cycle

This post deals with how the new obfuscation step modifies the app development cycle.

I use Eclipse to develop my app (Track Site). After some upgrade, when the app is ready to go live, I usually do the following tasks in order to publish it on the Android Market :
  1. adjust the version number
  2. export an unsigned version of the app from Eclipse
  3. sign it using the standard jarsigner tool
  4. align it using the standard zipalign tool

Obfuscation, as explained in Proguard, Android, and the Licensing Server, involves additional steps that replace the former 2) to 4) steps :
  1. adjust the version number the same way you've done it before
  2. obfuscation is performed using ant (not Eclipse) by issuing a command on the terminal

    mac:TrackSites $ ant release
    Buildfile: ~/workspace/TrackSites/build.xml

    As indicated in the Proguard, Android, and the Licensing Server post, the local.properties file has been modified to perform the signing step [3)] automatically (it still asks you for the passwords though), as well as the alignment one [4)].

    You end up with a signed, aligned and obfuscated app file in the bin/ sub-directory : the app is named SiteListActivity-release.apk. Exporting the unsigned app from Eclipse generates an app file named TrackSite.apk.

    It's interesting to note that the obfuscation process is done in another hierarchy (bin/classes) than the one used by Eclipse (bin/).

  3. as the obfuscation may have broken things, there is another quality assurance phase of the obfuscated app (SiteListActivity-release.apk), not of the non-obfuscated app that has already been tested from Eclipse (TrackSite.apk)

    This should be done :
    a) on the emulator :
    • start the emulator in the background with an AVD as a parameter
      mac:TrackSites $ emulator -avd a8w480 -wipe-data &
      [1] 536
      2010-11-11 10:14:15.172 emulator[491:903] Warning once: This application, or a library it uses, is using NSQuickDrawView, which has been deprecated. Apps should cease use of QuickDraw and move to Quartz.


      The -wipe-data option in the command line allows to « Reset the current user-data disk image (that is, the file specified by -datadir and -data, or the default file). The emulator deletes all data from the user data image file, then copies the contents of the file at -inidata data to the image file before starting. ».

      Here is the emulator state when it is started without the -wipe-data option
      And it's state with the -wipe-data option

      The list of devices + emulators connected to the computer is obtained with
      mac:~ $ adb devices
      List of devices attached
      HTxxxxxxxxxx device <----- the real device emulator-5554 device <----- the emulator

    • install the obfuscated app (SiteListActivity-release.apk) on the emulator using adb command line tool
      mac:TrackSites $ cd bin
      mac:bin $ ls Site*
      SiteListActivity-release.apk SiteListActivity-unsigned.apk
      SiteListActivity-unaligned.apk SiteListActivity.ap_
      mac:bin $ adb -e install SiteListActivity-release.apk
      1340 KB/s (94595 bytes in 0.068s)
      pkg: /data/local/tmp/SiteListActivity-release.apk
      Success
      mac:bin $

      The -e option in the command line « direct an adb command to the only running emulator instance. ».

      The app is now installed in the emulator where it can be tested :

    b) on a real device : it's pretty much the same process as above but on a real device instead of an emulator.

    When installing the app on the device, you may encounter an error if a previous version of the app has been installed from the market :
    mac:bin $ adb -d install SiteListActivity-release.apk
    821 KB/s (94595 bytes in 0.112s)
    pkg: /data/local/tmp/SiteListActivity-release.apk
    Failure [INSTALL_FAILED_ALREADY_EXISTS]
    mac:bin $

    By the way, please take note of the -d option in the command line « direct an adb command to the only attached USB device. ».

    The solution here is to remove the app on the device : Menu -> Settings -> Applications -> Manage applications then select the application to uninstall, click on the "Uninstall" button, confim ... it works ! But there's a better solution using adb :
    mac:bin $ adb -d uninstall fr.androidtobe
    Success
    mac:bin $


    You can now try to install just like before :
    mac:bin $ adb -d install SiteListActivity-release.apk
    839 KB/s (94595 bytes in 0.110s)
    pkg: /data/local/tmp/SiteListActivity-release.apk
    Success
    mac:bin $

  4. Ensure everything works and that the obfuscation has not broke anything. Then publish the obfuscated app (SiteListActivity-release.apk).

    If something has been broken during the obfuscation step, look for clues in the « But Wait, My App is Crashing Now » part of the Proguard, Android, and the Licensing Server post

Tuesday, November 9, 2010

HTC Desire HD - the permanent root with [DEV] PERMROOT & eMMC write [INSTRUCTIONS]

A permanent root solution has been found for the HTC Desire HD. Detailled instruction are in the XDA-Developers post [DEV] PERMROOT & eMMC write [INSTRUCTIONS].

Nexus One : how to prepare for Gingerbread

The next release of Android, Gingerbread, is rumored to be OTA released in the coming days. Android Central, working with XDA-Developers wiki comes with a welcomed [How-to] Prep Nexus One for Gingerbread

« If you're like us, and have your Nexus One hacked nine ways to Sunday, you'll need to get ready if you don't feel like waiting for someone to rip it apart and whip up a version for the rooted and ROM'd crowd. »

Saturday, November 6, 2010

Nexus One - installing [ROM] Enomther's TheOfficial Nexus1 - v2.13.2 - 10/11/2010

I've decided to give a try to [ROM] Enomther's TheOfficial Nexus1 - v2.13.2 - 10/11/2010.

The Nexus state before installing Enomther's TheOfficial ROM :


Here are the detailled steps to install it on a rooted Nexus One.
  1. connect the Nexus to your computer using the USB cable
  2. download the resources and check the md5
  3. copy the files to the SD card.
    You can either mount your phone in USB storage mode (recommended) or use adb tool
    The files to be copied to the root of the SD card are :
    • RADIO TheOfficial_Nexus1_Radio_Update_4.06.00.12_7.zip
    • ROM : TheOfficial_Nexus1_v2.13.2_update.zip
    • MUSIC : origmusic_2.12.1.zip
    • CAM : origcam_2.12.3_kernel_audiomod.zip
    • TORCH : CMMod_Torch_2.11.3.apk.apk
    The RADIO TheOfficial_Nexus1_Radio_Update_4.06.00.12_7.zip will be flashed.
  4. make a Nand backup
    • Reboot the Nexus One in bootloader mode : hold down the trackball while you press the power button. Ensure to maintain the trackball hold down until the screens turns to a white screen with 3 green android skating at the bottom of the screen. Ensure that the Nexus One stay connected to the computer via the USB cable.
    • on the screen, the BOOTLOADER should be highlighted with blue. press power button
      on the new screen, scroll down with the Volume down button to highlight the RECOVERY option. Press the power button.
    • the Nexus One reboots and after a few seconds, the screen title with "Android system recovery" appears, with the "Build : RA-nexus-v1.7.0" at the bottom of the screen. The screen should be in cyan instead of green if the Nexus One has already been rooted
    • scroll down with the trackball to the "Backup/Restore" menu and press the trackball
    • on the new screen "Choose backup/restore item" choose the option "Nand Backup" (the first one) by scrolling down the trackball and press the trackball to select it. The question "Create Nandroid backup?" appears at the bottom of the screen, so press the trackball to confirm as it is stated
    • The backup starts, it takes a few seconds to complete. At the end of the backup, the cyan screen is restored. Press Volume down button to return to the previous screen "Android system recovery".
  5. flash the RADIO
    • back to the Android system recovery screen, scroll down to the Flash zip from sdcard item using the trackball. Press the trackball to select
    • on the new screen Choose update ZIP file, use the trackball to select the right ZIP file to flash. Start with the RADIO TheOfficial_Nexus1_Radio_Update_4.06.00.12_7.zip. then press the trackball to start the flashing. Press the trackball again to confirm flashing on the question "Install : TheOfficial_Nexus1_Radio_Update_4.06.00.12_7.zip ?" that appears at the bottom of the screen. The ROM flashing starts and many messages appears on the screen.
    • after some time, the message "Install from sdcard complete" appears and you're asked to reboot the phone to write the image on the phone. Press the trackball to proceed
    • after some time, you're back to the Android system recovery screen
  6. WIPE
    • from the Android system recovery screen, select the WIPE item using the trackball and press it
    • from the new screen "Choose wipe item", highlight the "wipe data/factory reset" item (the first one) and press the trackball once to select it, then press the trackball another time to confirm to proceed as it is asked at the bottom of the screen
    • then redo the same steps for the "Wipe cache", "Wipe Dalvik-cache", "Wipe battery stats", "Wipe rotate settings" but don't wipe the "SD:ext partition"
    • press VOL-DOWN to return to the Android system recovery screen
  7. flash the ROM
    • highlight the "Flash zip from sdcard" item using the trackball and press the trackball to select the item
    • from the "Choose update ZIP file" screen, highlight the "TheOfficial_Nexus1_v2.13.2_update.zip" item and press the trackball to select it. Press the trackball another time to confirm as you're asked to at the bottom of the screen. The flashing starts. At the end of the process, you're back to the Android system recovery screen.
    • follow the same steps to flash the MUSIC origmusic_2.12.1.zip
      and CAM origcam_2.12.3_kernel_audiomod.zip files. The nexus reboots automatically after fashing each of those files.

After flashing the Enomther's TheOfficial Nexus ROM :

Monday, November 1, 2010

Desire HD - rooting and shutdown, restart and fastboot modes

The Desire HD has 3 modes when it comes to shutdown and startup :
  • full shudown : it's the classical way of shutting down Android. All processes are killed and the caches are flushed. After a shutdown, there is a cold start which takes quite a lot of time : about 25s to get the htc logo with the djingle + 40s more to load Android and ask you to enter your PIN code + 25s more to register on the network.

    rooting : After a full shutdown, the temporary rooting needs to be done again, and any package that may have been disabled (see [GUIDE] Disabling Stock/System Apps) has to be disabled again.
  • restart (reboot) : it's also a classical way to restart Android that takes approximately the same time the full shutdown process takes.

    rooting : After a reboot, the temporary rooting needs to be done again, and any package that may have been disabled (see [GUIDE] Disabling Stock/System Apps) has to be disabled again, like after a full shutdown.
  • fastboot shutdown : this is a new shutdown mode introduced by HTC in its latests smartphones. It basicaly freeze everything (processes, cache, ...) in its state and then has just to unfreeze them to startup. The startup process is then very fast : less than 5s for the phone to ask you to enter your PIN code + 25s more to register on the network.

    rooting : After a fastboot shutdown, the temporary rooting that may exists before the fastboot still exists and does not need to be done again, and any package that may have been disabled (see [GUIDE] Disabling Stock/System Apps) is still disabled. By the way, any app that have been launched before the fastboot is still awake and available through a long press on the Home button.


The power-down screen look like :


The fastboot shudown mode has to be activated from the "Menu" -> "Settings" -> "Applications" -> "Fast boot" checkbox :


The restart option ask for a confirmation :

Sunday, October 31, 2010

"setCPU for Root Users" saves the battery of your Android device

I've used setCPU for Root Users on my Nexus and now on my Desire HD to save battery : setCPU adjusts CPU speed to what is needed to perform the required tasks.


setCPU lets you adjust the lower and upper speed for your CPU. There's a "device selection" function in the menu that lets setCPU perform all the computing and suggest the appropriate values for your hardware. Here's a screenshot for the Desire HD.


The "Time in State" section from the "info" tab lists the time your phone has spent at different speeds. From the following screenshot, it appears the Desire HD CPU speed scales between 4 speeds from 245 MHz to 1024 MHz, spending most of its time between the upper and lower speed. The same screen on the Nexus One shows many different speeds, the Nexus spending most of its time on the lower speed (it naturally depends on how you use your Nexus).


As said in its name, setCPU for Root Users require root access.Rooting instructions can be found here :

Head to setCPU for Root Users's official page to get more informations on setCPU, specially on how to use setCPU to overclock / underclock your CPU.

Scan the following QR-code to download setCPU from the Android Market.

Saturday, October 30, 2010

Desire HD Ace : how to temporary root - [GUIDE] Temp Root [VISIONary by PaulOBrien]

Right now, there's no permanent rooting solution for the new HTC Desire HD (for UK).


But there's a temporary root solution provided by MoDaCo with the VISIONary app available on the Android Market.

Friday, October 29, 2010

HTC Desire HD (Ace)

Just receive my new Android phone : the HTC Desire HD (here in english HTC Desire HD).

Very nice phone.

But still not permanently rooted at the time of this writing.

Track Site : how to backup and restore your bookmarks

Before changing Android phone or making a factory reset, you need to backup your Track Site bookmarks before, in order to restore them on your new Android phone or after the factory reset.


1) Backup the bookmarks

To backup, go to "Menu" --> "More" --> "Backup".


The "track_sites.ini" file is created at the root of the SD card. The backup erase any file with the same name.


2.1) Factory reset

If you just make a factory reset, keeping the same phone, you don't have anything more to do, as long as you don't erase your SD card or format it : proceed with the factory reset, then restore your bookmarks following the instructions of section 3) below.

If you want to change your SD card or format it, you need to keep the backup (the "track_sites.ini" file) in a safe place before changing your SD card or formatting it, and then follow the instructions in the next 2.2) section


2.2) Transfer to a new phone

If you change your Android phone or your SD card or format your SD card, you need to transfer the "track_sites.ini" file from your old phone to the root of the SD card on your new Android phone.

This can be done in 2 ways :
  1. The easiest way (recommended) is by connecting your phone to a desktop computer (PC / Mac / Linux) and mounting it as an USB drive.

    This is direct on Mac.
    You need a driver on Windows.

    You just have to copy the "track_sites.ini" file from your old phone phone to the new one (or to a safe place on your computer if you want to format your SD card or change it).
    Then, unmount or disconnect the new phone from USB in order to be able to access the SD card contents.
  2. Developers can use the adb tool (see 2.2 bis) below).

3) Restore the bookmarks

To restore your bookmarks, go to "Menu" --> "More" --> "Restore"
The "track_sites.ini" file is read from the root of the SD card and it's content is loaded in the Track Site app.

Be aware of not loading the file multiple times as file bookmarks are added to the ones that may already exists.


2.2 bis) The adb (hard) way for the developers

The "USB debugging" option should have been activated on both phones ("Settings" --> "Applications" --> "Development" --> "USB debugging").

The full file path is /mnt/sdcard/track_sites.ini

And here is how to get it and transfer it :
  • a) ensure your phone is available

    mac:~ $ adb devices
    List of devices attached
    xxxxxxxxxxx6 device
  • b) ensure the file is where you think it is

    mac:~ $ adb shell
    # ls -l /mnt/sdcard/tra*.ini
    ----rwxr-x 1 system sdcard_r 30719 Oct 28 12:57 /mnt/sdcard/track_sites.ini
    # exit
    mac:~ $
  • c) then go to the directory where you want to download the file (Downloads in the following example) and pull it

    mac:~ $ cd Downloads/
    mac:Downloads $ adb pull /mnt/sdcard/track_sites.ini
    847 KB/s (30719 bytes in 0.035s)
    mac:~ $
  • d) then connect the new phone as in a).

    Ensure the old phone is disconnected from your system or you end up with 2 devices (2 lines) with the adb devices command.

    mac:Downloads $ adb devices
    List of devices attached
    xxxxxxxxxxx6 device
    yyyyyyyyyyy9 device
    mac:~ $
  • e) remove any /mnt/sdcard/track_sites.ini file from the destination.

    mac:Downloads $ adb -s yyyyyyyyyyy9 shell
    $ ls -l /mnt/sdcard/track_sites.ini
    ----rwxr-x system sdcard_rw 1241 2010-10-29 11:03 track_sites.ini
    $ rm /mnt/sdcard/track_sites.ini
    $ ls -l /mnt/sdcard/track_sites.ini
    /mnt/sdcard/track_sites.ini: No such file or directory
    $ exit
    mac:~ $
  • f) push the track_sites.ini file to its final location /mnt/sdcard/track_sites.ini.

    mac:Downloads $ adb -s yyyyyyyyyyy9 push track_sites.ini /mnt/sdcard/track_sites.ini
    1505 KB/s (30719 bytes in 0.019s)
    mac:~ $

Thursday, October 28, 2010

Nexus One - how to upgrade to CyanogenMod-6.1 V6.1.0-RC1 (10/27/2010) - instructions

I have just installed the CyanogenMod-6.1 first release candidate V6.1.0-N1-RC1 - 10/27/2010 (CyanogenMod-6.1 for Nexus One: Holy crap, it's full of AWESOME! V6.1.0-RC1 (10/27/2010)). Just keep in mind it is the 1st Release Candidate and as such, there are still some issues.

As the required radio image is still radio-4.06.00.12_7.img (Radio Firmware: 4.0.6.00.12_7 (FROYO RADIO, 4.06 OR HIGHER REQUIRED!)), I just have to upgrade to the new CyanogenMod-6.1 6.1.0-RC1.

I slightly depart from Cyanogen's instructions to upgrade :
  1. Do a Nandroid Backup !
    --->> steps 1) to 11) from Nexus One - how to upgrade to CyanogenMod-5 [stable 5.0.6 version of 04/15/2010] - detailled instructions
  2. Wipe : I add this step as it prevents problems with Google Apps ; just remember to save everything before (don't forget to backup your Track Site's data).
    The wipe has to be done while in recovery mode just after the Nandroid backup (the previous step).
    Here are the detailled steps :
    • from the "Android system recovery" screen you are just after the step 11), scroll down to the "Wipe" item using the trackball, press on the trackball to select the item
    • On the "Choose wipe item" screen, choose the "Wipe cache" item (the 2nd one) using the trackball. The "Wipe cache" seems to be enough and does not need to reinstall all applications. Press the trackball a 2nd time to confirm on the question that appears on the back of the screen.
    • The wipe starts and takes a few seconds to complete. At the end of the wipe, the cyan screen is restored. Press Volume down button to return to the previous screen "Android system recovery".
    • follow on with step 14) of the upgrade procedure
  3. Install the CyanogenMod-6.1 6.1.0-N1-RC1 - 10/27/2010 ROM (your Google apps will be backed up automatically)
    --->> steps 14) to 16) from Nexus One - how to upgrade to CyanogenMod-5 [stable 5.0.6 version of 04/15/2010] - detailled instructions. Don't reboot at this time and continue with the step below
  4. There's a 4th step to Cyanogen's instructions to install the most up to date version of Google apps : HDPI-20101025 (UPDATE 11/03 : Google Apps have been made available in a dedicated place : http://goo-inside.me/google-apps/ ; a wiki dedicated to Google Apps have been made available )
    --->> steps 15) and 18) from Nexus One - how to upgrade to CyanogenMod-5 [stable 5.0.6 version of 04/15/2010] - detailled instructions. At the end, just reboot (or power-down by selecting the right option with the trackball in step 17)).

The detailed instructions to follow are pretty much the same as for Nexus One - how to upgrade to CyanogenMod-6 V6.0.0-RC1 (07/11/2010) - instructions to get the 6.1.0-N1-RC1 - 10/27/2010 ROM update-cm-6.1.0-RC1-N1-signed.zip installed.

Tuesday, October 19, 2010

ProGuard obfuscation : error Could not load definitions from resource proguard/ant/task.properties

I've just tried to obfuscate my TrackSite app with ProGuard following Dan Galpin's instructions from Proguard, Android, and the Licensing Server.

I've encountered the « Could not load definitions from resource proguard/ant/task.properties » error during the ant release build :

compile:
[javac] /Users/raph/droid/android-sdk-mac/tools/ant/ant_rules_r3.xml:336: warning: 'includeantruntime' was not set, defaulting to build.sysclasspath=last; set to false for repeatable builds
[javac] Compiling 1 source file to /Users/raph/droid/workspace/TrackSites/bin/classes

-dex-obfuscate:
[taskdef] Could not load definitions from resource proguard/ant/task.properties. It could not be found.
[delete] Deleting: /Users/raph/droid/workspace/TrackSites/obf/original.jar
[jar] Building jar: /Users/raph/droid/workspace/TrackSites/obf/original.jar

BUILD FAILED


The add-proguard-release.xml provided with the Proguard, Android, and the Licensing Server contains the following definitions at lines 19 and 29

<property name="proguard-jar" value="${proguard.dir}/proguard.jar" />
...
<taskdef resource="proguard/ant/task.properties" classpath="${proguard-jar}" />


This refers to a task.properties file. According to the article Obfuscating Your MIDlet Suite from the Sun Developer Network (look for section « Ant Script ») this file is included into the proguard.jar jar file distributed with ProGuard, inside the .jar file.

Then, the solution is to update the property at line 19 to point to the real location of the proguard.jar archive, that is located in the lib/ sub-directory. So the property's value should be « value="${proguard.dir}/lib/proguard.jar" »

<property name="proguard-jar" value="${proguard.dir}/lib/proguard.jar" />


The ant release build then looks like :

compile:
[javac] /Users/raph/droid/android-sdk-mac/tools/ant/ant_rules_r3.xml:336: warning: 'includeantruntime' was not set, defaulting to build.sysclasspath=last; set to false for repeatable builds
[javac] Compiling 1 source file to /Users/raph/droid/workspace/TrackSites/bin/classes

-dex-obfuscate:
[delete] Deleting: /Users/raph/droid/workspace/TrackSites/obf/original.jar
[jar] Building jar: /Users/raph/droid/workspace/TrackSites/obf/original.jar
[proguard] ProGuard, version 4.5.1
[proguard] Reading input...
[proguard] Reading program jar [/Users/raph/droid/workspace/TrackSites/obf/original.jar]
[proguard] Reading library jar [/Users/raph/droid/android-sdk-mac/platforms/android-8/android.jar]
[proguard] Reading library directory [/Users/raph/droid/workspace/TrackSites/libs]
[proguard] Initializing...
[proguard] Note: the configuration refers to the unknown class 'com.android.vending.licensing.ILicensingService'
[proguard] Note: there were 1 references to unknown classes.
[proguard] You should check your configuration for typos.
[proguard] Ignoring unused library classes...
...

Monday, August 23, 2010

Android - what an Android tablet just can't be

There's a lot of Android tablets announced out there. According to their specifications, most of them are unable to bring a somewhat new user experience beyond the one Android phones already bring.

An Android tablet just can't be an Android phone with some interfaces (USB, HDMI, ...) and a wider 7+ inch screen but limited to a 800x480 resolution.

Sunday, August 8, 2010

Track Site 1.02.44 - adding support for QVGA (240x320) screen devices (Xperia X10 Mini and the likes)

Following Shantanu's post on QVGA screen (240x320) devices support (Android Dev Tip: App Not Showing on X10 Mini Marketplace), I just release a new version of Track Site (1.02.44).

Some screenshots from the emulator :


The screen is tiny but it works fine :

Drop me an email or add a comment (better) to let me know how it's behave on a real device.

Wednesday, July 14, 2010

Nexus One - how to upgrade to CyanogenMod-6 V6.0.0-RC1 (07/11/2010) - instructions

I have just installed the CyanogenMod-6 first release candidate V6.0.0-RC1 (07/11/2010) ([ROM] CyanogenMod-6 for Nexus One: Holy crap,full of AWESOME! V6.0.0-RC1 (07/11/2010) on XDA-developers) — the one that brings Froyo (Android 2.2) to my Nexus One.

As I had already installed the radio image radio-4.06.00.12_7.img when I had installed the CyanogenMod-5 5.0.8-N1, this time, I just have to upgrade to the new CyanogenMod-6 6.0.0-RC1.


So Cyanogen's instructions to upgrade are :

- Upgrading?
1. Do a Nandroid Backup!
2. Install the CyanogenMod-6 V6.0.0-N1-RC1 - 07/11/2010 ROM (your Google apps will be backed up automatically)

I add a 3rd step to Cyanogen's instructions to install the most up to date version of Google apps :
3. Optionally install the FRF91-HDPI Google Addon as CyanongenMod 5.0.8 installs EPF30+ Google Addon

The detailed instructions to follow are the same as for Nexus One - how to upgrade to CyanogenMod-5 [stable 5.0.6 version of 04/15/2010] - detailled instructions to get the CyanogenMod-6 V6.0.0-N1-RC1 ROM update-cm-6.0.0-N1-RC1-signed.zip installed, skipping the WIPE steps 12) and 13) as it is not a first install and as Cyanogen doesn't require a WIPE in it's instructions.

Then I do again step 15) to install the FRF91-HDPI Google Addon gapps-hdpi-FRF91-signed.zip and I finish by a power down on step 17) instead of a reboot.

On step 18) everything started as usual, but the boot time was longer.


First surprise, the screen looks like my personalized screen instead of the new Froyo screen. Then my Gmail account was unavailable, and it was impossible to register a new one, making any synchronization impossible.

I then have to perform a factory reset to solve the problem. Everything works well now. But it suggests Cyanogen's instructions need another step to perform some kind of wipe.


The new CyanogenMod-6 comes with new wallpapers.

Wednesday, July 7, 2010

Track Site 1.02.42 - an improved user interface

Track Site user interface has been improved a lot over the last releases. Here is a review of the improvements.

The main screen

On the upper part of the main screen are, from left to right :
  • the bookmarks import button, which allows to import bookmarks from the stock Android browser. Just touch it and the bookmarks that have been defined since the last import will be imported into Track Site under the tag « imported »
  • the multiple tags filter display, which shows the tags on which the bookmarks are filtered on
  • the multiple tags filter button, which allows to set the multiple tags filter
The filtered bookmarks are displayed bellow.


The multiple tags selector screen

This screen appears when the multiple tags filter button has been touch. Here, you can :
  • sort the tags alphabetically ; please note that selected tags have a green check on the right and that checked tags are grouped before unchecked tags to allow for better understanding
  • just touch a tag to check or uncheck it ; please note that the bookmarks will be displayed only if they are tagged by all the bookmarks that are in the filter
  • the clear button uncheck all the tags in one touch
  • the cancel button allows to return to the main screen without changing the tag filter
  • the Ok button activates the new tag filter


The bookmarks editor screen

This screens allows to edit bookmarks information :
  • edit bookmark's information : the name, the description, the URL, the tags (touching the button displays the tags management screen)
  • save your changes, making them permanent
  • delete the bookmark : a confirmation dialog appears to confirm your decision as deleted bookmarks can't be undeleted
  • just return to the main screen, discarding any change that can have been underway

There are 2 ways to get on this screen :
  • using the menu button and choose the « create » or « edit » menu items
  • by long pressing on the bookmark, then touching « create » or « edit » items on the contextual menu that appears above the screen


The multiple tags management screen

This screen allows for bookmark's tag management :
  • selecting one or more tags
  • defining new tags ; created tags are automatically checked

Monday, June 21, 2010

Nexus One - how to upgrade to CyanogenMod-5 [stable V5.0.8 (06/19/2010)] - instructions

The new 5.0.8 CyanogenMod has been released : CyanogenMod-5 for Nexus One: Kang Central Station V5.0.8 (06/19/2010) ([ROM] CyanogenMod-5: Kang Central Station (STABLE) [06/19/2010 / 5.0.8]).

Here are the detailed instructions to install it.

As the Nexus One's radio image has to be flashed to the Froyo's one, the instructions to follow are the ones Cyanogen gives for a first install, starting from step 2 with a wipe on step 4 :
- First time flashing CM to your Nexus (or coming from another ROM)?
1. Unlock your device and install Clockwork Recovery or Amon_RA's recovery image
2. Do a Nandroid backup!
3. Update your radio if necessary
4. WIPE
5. Install the ROM
5. Optionally install the Google Addon

If it's the first time flashing your Nexus, start from step 1 !! Directions can be found in the post Nexus One - CyanogenMod For Nexus One V5.0.5.3 (03/23/2010).

It may be useful to read the full process here How to Root Your Nexus One as well as other resources I have used for the initial root of my Nexus
Nexus One - CyanogenMod For Nexus One V5.0.5.3 (03/23/2010). Detailed instructions on the Cyanogen firmware upgrade process can also be found in my other post
Nexus One - how to upgrade to CyanogenMod-5 [stable 5.0.6 version of 04/15/2010] - detailled instructions.


So let's start :
  1. first, prepare everything that is needed. Download all the images : CyanogenMod 5.0.8-N1 latest version, EPF30+ Google Addon and FRF50 Radio Firmware
  2. check the MD5 checksum of the CyanogenMod 5.0.8-N1 and FRF50 Radio Firmware files with a md5 the file to check on the command line
  3. connect your Nexus to your computer and mount it turning on USB storage mode, then copy the CyanogenMod 5.0.8-N1 and EPF30+ Google Addon files to the root of your SDcard but leave the FRF50 Radio Firmware on your computer as it will be flashed using a “fastboot flash radio the radio .img file” command from your computer's command line
  4. ensure the fastboot utility is in your PATH. The fastboot utility is not in the standard Android SDK on Mac but it can be found in the SuperBoot image which contains a fastboot version for Mac, Linux and Windows. Choose the one that pertains to your platform and put it in the android/tools directory, renaming it simply as fastboot
  5. proceed with step 2 : the Nandroid backup. Follow detailed instructions from step 5 to step 11 of the post Nexus One - how to upgrade to CyanogenMod-5 [stable 5.0.6 version of 04/15/2010] - detailled instructions
  6. at then end of step 11, on screen "android system recovery", use the track ball to choose power off item (the last one), then press the track ball to select the option, and press the track ball a second time on the question to confirm the power off
  7. let's proceed with step 3 : update your radio. The following is based on instructions from How to Root Your Nexus One
  8. Boot the phone while holding down the VOLUMEDOWN-key. The screens turns white with 3 green Androids skating at the bottom of the screen. FASTBOOT is hilighted in blue. Press power button to enter fastboot mode.
  9. on your computer, open a command line shell. Navigate to the directory where the radio-4.06.00.12_7.img radio image has been stored. Then enter the command ./fastboot flash radio radio-4.06.00.12_7.img. The fastboot command starts by sending the radio image and display a status sending 'radio' (26112 KB)... OKAY, then writes the radio image ans display a status writing 'radio'... OKAY.
  10. back on your Nexus, select POWER DOWN item on the FASTBOOT USB screen using VOL DOWN key, then press power button.
  11. time to proceed with step 4 : WIPE. Reboot in RECOVERY mode by pressing power button while holding down the VOLUMEDOWN-key. The screens turns white with 3 green Androids skating at the bottom of the screen. FASTBOOT is hilighted in blue. Press VOL DOWN key to hilight RECOVERY, then press power button. The Nexus boot screen (the 4 colors cross) appears followed by the Cyan "Android system recovery" screen
  12. Use the trackball to hilight the "Wipe" item then press the trackball. On the "Choose wipe item" screen, wipe everything as stated on step 6 Wipe of How to Root Your Nexus One.
    • select the first open and press the scrollball
    • press the scrollball again to confirm
    • then repeat for all items on the Wipe page
    In the future, wiping this thoroughly won’t likely be needed, but this time, you’ll want to wipe really well.
    Press the Down-volume button to return to the prior menu.
  13. it's time to proceed with step 5 : install the ROM. Back to the "Android system recovery" cyan screen, use the trackball to select item "Flash zip from sdcard", then press the trackball.
  14. the screen "Choose update ZIP file" shows the 2 zip files update-cm-5.0.8-N1-signed.zip and gapps-passion-EPF30-signed.zip that were written on the SDcard at the beginning of the process. Select the "update-cm-5.0.8-N1-signed.zip" then press the trackball to install it, pressing the trackball another time to confirm.
  15. continue with step 5 again : optionally install the Google Addon.perform the same steps another time to install the gapps-passion-EPF30-signed.zip that contains Google's apps.
  16. Back to the "Android system recovery" cyan screen, use the trackball to select item "Power off", then press the trackball to confirm.
  17. That's all Folks !! Reboot your Nexus and enjoy ;-)


Latest version: 5.0.8-N1 - 06/19/2010
Download: http://cyanogen-updater.googlecode.com/files/update-cm-5.0.8-N1-signed.zip
Download: http://android.chemlab.org/android/nexus/update-cm-5.0.8-N1-signed.zip
MD5Sum: 70aa95ee1b22101901cd75e9bc6e92ba

Google Addon: EPF30+
Mirror: http://www.mediafire.com/download.php?mjzwozjojkh

Radio Firmware: FRF50 (FROYO RADIO, REQUIRED!)
Download: http://android.chemlab.org/android/nexus/radio-4.06.00.12_7.img
MD5Sum: 3321c196d8ec1cf748fd20c3c4068520

Sunday, June 13, 2010

Track Site 1.02.34 - french language localization

French language support has been introduced in the version 1.02.34 of Track Site.

Tuesday, June 8, 2010

Track Site 1.02.32 - import bookmarks from stock browser

This new release of Track Site (v1.02.32) introduces the import of stock browser's bookmarks. Import is accessible through « Menu », then « More » and finally « Import browser's bookmarks ». Bookmarks that have been created since the last import are imported and tagged with « imported». Bookmarks are imported into Track Site whether they already exists or not.

Wednesday, June 2, 2010

Track Site - 1.01.31 - now build for Eclair (Android 2.1)

The 1.01.31 version of TrackSite is now build for Android 2.1 (aka Eclair). It may still work on Android 1.6 (Cupcake) devices.
This version introduces a local database to store the bookmarks and the additional infos — the description and the tag list. More to come on this side as the stock browser's bookmarks are also stored in a database.
Introducing a local database make the app working even when the SDcard has been removed.
Existing bookmarks from /sdcard/sites.ini file are automatically loaded into the database at first launch.

Wednesday, May 26, 2010

Nexus One - upgrade to Cyanogenmod For Nexus One V5.0.7.1 (05/25/2010) - detailed instructions

Cyanogen release a new V5.0.7.1 firmware a few hours after the V5.0.7 release. The firmware can be downloaded from Cyanogenmod For Nexus One V5.0.7.1 (05/25/2010) ([ROM] CyanogenMod-5: Kang Central Station (STABLE) [05/25/2010 / 5.0.7.1] on xda-developers).

Detailled instructions to install the v5.0.7.1 firmware are the very same that can be found in Nexus One - how to upgrade to CyanogenMod-5 [stable 5.0.6 version of 04/15/2010] - detailled instructions

extract of the CHANGELOG centered on V5.0.7 :

CHANGELOG

---- 5.0.7.1-N1
* N1: Fix blurry images in Gallery3D
* Common: Color picker and reset-to-defaults option for new UI customizations (Wysie)

---- 5.0.7
* Common: Resync with Google as of 05/20/2010
* Common: New ARM optimizations in Bionic from Jim Huang @ 0xlab
* Common: Superuser 2.1 from ChainsDD
* Common: DeskClock style tweaks from Nathan Zachary
* Common: Email signature support from Jarrett Vance
* Common: Pin-lock and alternate lockscreen framework from _avatar
* Common: Updated Japanese locales from Takuo Kitame
* Common: Added Compcache and rzscontrol to the build
* Common: APN list updated by Paul Weiss, blunden, and PsychoI3oy.
* Common: Downloader allows any file to download - thanks Eddie Ringle
* Common: Kernel updated to 2.6.33.4
* Common: Fix bug with where wrong organization is shown in-call (Boyd Bischke)
* Common: Several kernel patches from Christopher Lais (Zinx) to improve stability and support MT3G Fender/1.2
* Common: Low memory killer was pimped out by San Mehat @ Google. Big interactivity boost especially on D/S
* Common: Updated Phone patches from Cytown (v29)
* Common: Dim the deskclock screensaver colors
* Common: Fixed race conditions and notification bugs in MMS
* Common: Added quick uninstall "Delete Zone" to Launcher and Launcher2 (Ander Webbs)
* Common: Allow widgets in the Launcher default workspace (ported from Launcher2 by Lox)
* Common: Fix race conditions and bugs in MMS app
* Common: Compact drawer can be toggled for Launcher as well as Launcher2 now
* Common: Added squisher script for release builds
* Common: Another lowmemorykiller tweak from Zinx to take cache into account
* Common: Turned off battery percentage display by default
* Common: Added "omni-tether" from Wertarbyte for BT tether
* Common: System built using Zinx's resource-sorter patch for aapt- may provide perf boost
* Common: Patch from Zinx to have background processes holding wakelocks set to a higher OOM kill adjustment (push notify, mms are good examples)
* Common: Number of recent apps is configurable - Bcrook, Pershoot & Wysie
* Common: Ability to disable icons and paths on the lockscreen - Wysie
* Common: Add pand and hidd to the build
* Common: Fix OpenVPN- manifest was using the wrong mtpd
* Common: DeskClock: Add alarm timeout setting (Michael Webster)
* Common: OpenVPN: Select between TAP and TUN interface (Takuo Kitame)
* Common: Various UI element colors are selectable via Spare Parts (Wysie)
* Common: NEON-optimized libjpeg (CodeAurora/Qualcomm)
* Droid: Fix for 50% signal loss reporting bug on Motorola Droid (Boyd Bischke)
* Droid: Disable V8. It was breaking Epocrates and other applications
* Droid: Tweak the haptic feedback to better match stock (Adrynalyne)
* Droid: Enable Dialpad for OTA Activation (nuclear305)
* D/S: Full support for Dream and Sapphire devices (eclair-ds branch)
* D/S: Updated wallpapers and Launcher for MDPI
* D/S: Build various OMX components from source (via CodeAurora)
* D/S: libcamera originally reverse engineered by NCommander
* D/S: Various driver issues causing battery drain were fixed by Zinx
* D/S: disable menu in lockscreen, fix incall mute, speed up the boot
* D/S: raise min cpufreq to 245MHz (Wes Garner)
* D/S: add Prash's bootanimation
* D/S: Using HTC "Turbo Mode" clock settings
* D/S: Fix issues with notification LED on D/S
* D/S: Don't use msmsdcc_sdioirq, this leaves IRQs on all the time which can cause battery drain
* D/S: Fix RIL settings to improve performance
* D/S: Kill logspam from OMX
* D/S: Fixed 3MP camera preview and memory leaks
* D/S: Ship old Gallery app as Gallery3D has too many issues right now
* D/S: Fixed slidelock layout
* D/S: Fixed issue with picking contact for map directions
* D/S: Change oom-killer behavior to be more "swap friendly" if you want to go against everyones advice and use swap anyway
* D/S: Launcher tray images fixed by Prash
* D/S: CPU clock tweaks from Pershoot
* N1: CPU clock and memory tweaks from Pershoot (http://github.com/pershoot)
* N1: Trackball notification color blending option (from Ehud Shabtai http://github.com/eshabtai)

Wednesday, May 5, 2010

Nexus One - CyanogenMod 5.0.6 and 3G spotty issue - seems a kind of solution is about to be found

According to the thread 3G Connectivity Issue Fix? I think I found a solution using build.prop on the CyanogenMod forum, it seems a kind of solution to the Spotty 3G part 2 issue is about to appear.

It's not clear yet if it solves completely the 3G issue or only in part or if it is just a workaround, but it seems to improve the situation. And it's better than nothing considering Google had already said « engineering improvements » had been given an end : look for post from Ry Guy (Google employee) by 4/20/10.

By the way, some of the posts head to what seems to be very serious resources about 3G and mobile networks : Vodafone 3G vs Telecom XT on GeekZone forum.


Monday, May 3, 2010

Android - rooting, ROM, firmware, Cyanogen - what it is all about

For all those who wonder what rooting, ROM, firmware, Cyanogen all stand for, here are some links to help you understand what is is all about, the benefits, the down side :

Friday, April 30, 2010

Nexus One - disponible en mai en France - alors, l'acheter ou pas ?

Compte-tenu des nombreux échos négatifs dont le Nexus One a souffert, on peut se demander à l'occasion de la sortie du Nexus si c'est opportun d'en acheter un, ou s'il vaut mieux plutôt s'orienter vers un des autres modèles de même niveau : HTC Desire, HTC Incredible (lorsqu'il sera disponible), Sony Xperia 10, ...
Faites-vous votre opinion en lisant les commentaires de l'article Le Nexus One en mai chez SFR ! dans le Journal du Geek.

“Android in 2013” - Mark Murphy's six-party blog post series

Mark Murphy's six-party blog post series, “Android in 2013”, over on NetworkWorld.
  1. Smartphones
  2. Other devices
  3. Core OS capabilities
  4. Applications
  5. The overall ecosystem
  6. Open source

Tuesday, April 27, 2010

Nexus One - is Google starting to put an end to the whole "Nexus One experiment"

Recent moves on the Nexus One horizon makes one wonder if Google isn't starting to put an end to the whole « Nexus One Experiment » :

1) The 4/21/2010 Ry Guy post on the spotty 3G part 2 thread saying Google will no longer investigate the 3G issue


2) The 4/26/2010 news and updates designating the HTC Incredible as the next step after the Nexus One and announcing the Nexus One availability by april 30th in Europe when the HTC Desire — which doesn't seem to suffer from the same issues the Nexus One has — is already available from different mobile phone providers and resellers in Europe.


3) Is there another superphone Google wants to sell in it's online store after the Nexus One ?

Saturday, April 24, 2010

Nexus One - a week after the CyanogenMod 5.0.6 upgrade

A week after the upgrade to CyanogenMod 5.0.6 just want to add that the result is quite good :
  • the Nexus works well for me, and by that I just say that the CM 5.0.6 upgrade doesn't seem to broke anything ; the Nexus is still faster than before installing the CM5 ; others have been experiment some issues, so don't forget to have a look at CyanogenMod issues
  • the « 3G issue » is still not solved, but the CM5 greatly improves the situation as the N1 jumps far more frequently from 3G to HSPDA with faster page downloads ; it's also a kind of solution : when the N1 stay for too long stuck on « 3G » with nothing else happening, it's time to activate Airplane mode just to reset the chip, then go back to connected mode (de-activate Airplane mode) and refresh the page the N1 stay stuck on before
  • the « screen becoming crazy issue » is still not solved : perhaps it becomes less frequent, but I'm not confident at all in that as I still have the problem after playing with the N1 for some time
  • I want to activate « tethering » with Mac OSX 10.6.3 but I haven't succeed : I certainly have missed something, as it seem's working for others, so more to come on that topic

Sunday, April 18, 2010

Nexus One - how to upgrade to CyanogenMod-5 [stable 5.0.6 version of 04/15/2010] - detailled instructions

I just upgraded my Nexus One to CyanogenMod-5: Kang Central Station (STABLE) [04/15/2010 / 5.0.6].

As it is just a CyanogenMod-5 upgrade from 5.0.5.3-N1 to 5.0.6-N1, only the following steps are required :
  1. download the Cyanogen 5.0.6-N1 (the latest stable CyanogenMod for the Nexus One) from Cyanogenmod For Nexus One V5.0.6 (04/15/2010) : update-cm-5.0.6-N1-signed.zip
  2. check the MD5 sum :
    md5 update-cm-5.0.6-N1-signed.zip
    and check the checksum
    MD5 (update-cm-5.0.6-N1-signed.zip) = 43835d679958294befa16af78bf7311b
    against the one of the forum MD5Sum: 43835d679958294befa16af78bf7311b
  3. connect the Nexus One to the computer and mount the Nexus One in the Mac
  4. copy the Cyanogen 5.0.6-N1 (the update-cm-5.0.6-N1-signed.zip) file to the root of the Nexus One SD-card. Wait a few seconds in order to be sure everything is copied to the SDcard. Unmount the Nexus One on your computer.
  5. Reboot the Nexus One in bootloader mode : hold down the trackball while you press the power button. Ensure to maintain the trackball hold down until the screens turns to a white screen with 3 green android skating at the bottom of the screen. Ensure that the Nexus One stay connected to the computer via the USB cable.
  6. on the screen, the BOOTLOADER should be highlighted with blue. press power button
  7. on the new screen, scroll down with the Volume down button to highlight the RECOVERY option. Press the power button.
  8. the Nexus One reboots and after a few seconds, the screen title with "Android system recovery" appears, with the "Build : RA-nexus-v1.7.0" at the bottom of the screen. The screen should be in cyan instead of green if the Nexus One has already been rooted
  9. scroll down with the trackball to the "Backup/Restore" menu and press the trackball
  10. on the new screen "Choose backup/restore item" choose the option "Nand Backup" (the first one) by scrolling down the trackball and press the trackball to select it. The question "Create Nandroid backup?" appears at the bottom of the screen, so press the trackball to confirm as it is stated
  11. The backup starts, it takes a few seconds to complete. At the end of the backup, the cyan screen is restored. Press Volume down button to return to the previous screen "Android system recovery".
  12. FIRST INSTALL ONLY : scroll down to the "Wipe" item using the trackball and press the trackball to select the option
  13. FIRST INSTALL ONLY : in the new screen "Choose wipe item", using the trackball, select every wipe item one after the other and perform the wipe pressing the trackball. When every wipe has been performed, return the the previous screen using Volume Down button.
  14. back to the Android system recovery screen, scroll down to the Flash zip from sdcard item using the trackball. Press the trackball to select
  15. on the new screen "Choose update ZIP file", use the trackball to select the right ZIP file to flash. Here, there should be only one zip file available to flash : update-cm-5.0.6-N1-signed.zip. then press the trackball to start the flashing. Press the trackball again to confirm flashing on the question "Install : update-cm-5.0.6-N1-signed.zip ?" that appears at the bottom of the screen. The ROM flashing starts and many messages appears on the screen.
  16. after some time, the message "Install from sdcard complete" appears and you're back to the cyan screen "Android system recovery" with the item "Reboot system now" selected by default
  17. just select the default option by pressing the trackball down. The Nexus One reboots.
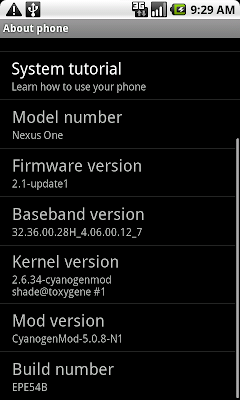
  18. after the Nexus One has boot the normal way, just to be sure, check the "Mod version" value in the "Setting" then "About Phone" : the value should be "CyanogenMod-5.0.6-N1"

I adapted the instructions from Step by Step Guide on How to Install Cyanogen Mod ROM on your Nexus One! to perform the upgrade.

Thursday, April 15, 2010

Nexus One - CyanogenMod For Nexus One V5.0.5.3 (03/23/2010)

I have just installed CyanogenMod For Nexus One V5.0.5.3 (03/23/2010). It takes me quite some time because I missed some important points, the most important one being to root my Nexus using superboot.

Cyanogen's advise is to download everything that will be necessary and to check the md5 checksum.

Then, the first step is to unlock the bootloader using fastboot. fastboot can't be found in the android sdk but it can be found in the superboot archive contents.

During the whole process, I've found useful instructions in those locations :
Everything seems to work well. More feedback soon.

Friday, February 12, 2010

Nexus One - review from a Finn developer - there still are some bugs

In the post A Month of Nexus One, Heikki Toivonen lists some the bugs he has encountered on the Nexus One : "I’ve encountered some annoying bugs as well. During my first week the phone got into a state where tapping the messaging icon always launched the browser. The only way I could recover was to reboot. This hasn’t happened since. Far more common problem is the soft keyboard not registering taps, or thinking I pressed one of the four buttons at the bottom (back, menu, home or search, with accompanied vibration feedback). Switching back and forth between apps fixes this eventually. I also seem to have situations when I don’t seem to get any GPS information. Some people have reported that this might require a reboot, but I haven’t been trying persistently enough to confirm if this is the only cure.".

I also encountered some problems with the four soft key at the bottom, where they don't seem to work at all, or when they seem to trigger the same action, or even when touching the screen in the middle triggers one of the four soft key button ... In those situations, the best thing has been to reboot the Nexus. It seems this happens more often when the phone has been up for some time, or when there has been some weakness in the network (I use the Nexus during my commuting time and there are a lot of places where there is no or poor quality network that make the Nexus to frequently switch between Edge and 3G).